


Having built up a design for the application, and mocked up the UI, it was time to write some code to bring those elements to life. Here's a brief high-level overview of this.
Architecture
As my first foray into native iOS development, I decided to start simple and remain objective. Partially motivated by my own frustrations and experiences of similar applications and having spoken with friends, colleagues, and family, I decided to produce the application as a single-purchase product without account or remote storage or processing elements.
From a technical perspective, the architecture of the application is nothing revolutionary or groundbreaking. Nor was this ever the intention. As a device-only application (i.e. no backend), all processing and data storage is conducted on-device which simplified and accelerated the development process, allowing me to focus on delivering the core behaviour and experience.
Structurally speaking, the application follows a relatively recognisable MVC pattern with intermediary services and a data management layer (repositories).
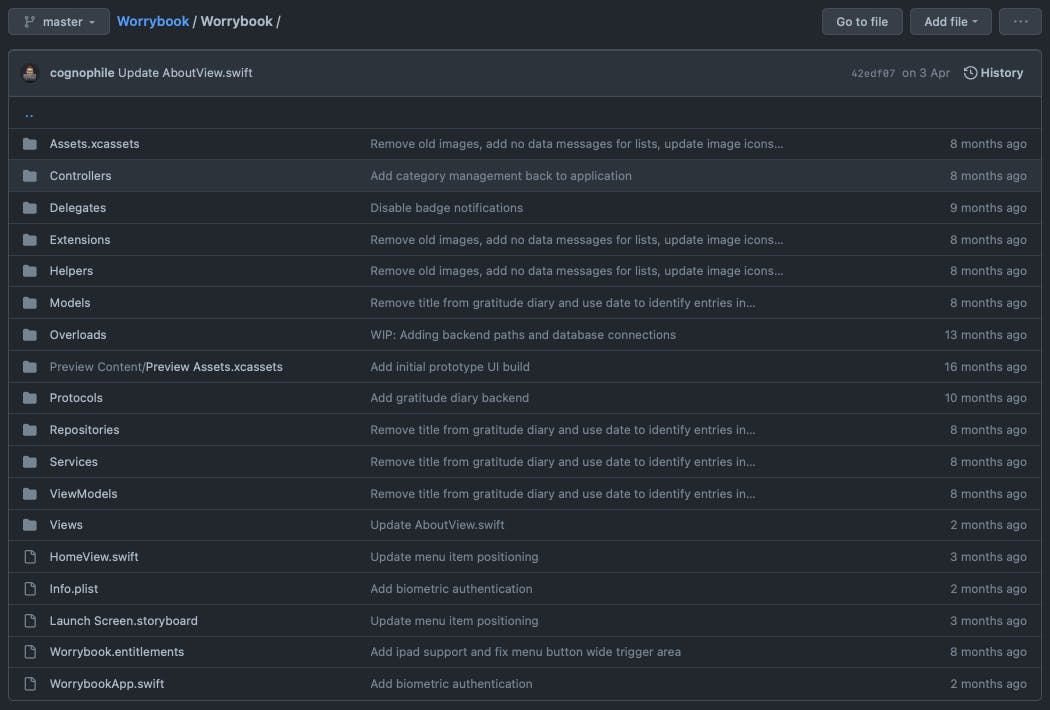
Worrybook - Code base structure.
For those who may not be familiar, let's review the structure
- Repository - Concerned with data storage solution communication.
- Model - Represents data entities at the data-layer.
- Controller - Mediates between the presentation layer and "backend" layers.
- View Model - Mimics the model structure, but with added behavioural elements.
- View - The presentational elements and behaviours presented to the user.
The reason for this? It's all about the classic single-responsibility principle - at the structural scope as much as class scope. Building on this, I've used protocol abstractions where possible to represent behaviour and contracts for Repositories, Models,View Models, and any Model-to-ViewModel Translation services.
Data Layer
The data storage solution is an on-device SQLite instance, which is a small, self-contained, full-featured SQL database engine with high-reliability often used in mobile development or bundled into applications as a stable, cross-platform, file-centric database.
To interface with SQLite, I decided to integrate the popular Swift library, SQLite.swift which has great documentation and is available through CocoaPods.
In retrospect, though I was familiar with CocoaPods from a previous project, it may have been more suitable to utilise the Swift Package Manager - something I'll likely look into in the future.
Features
In terms of features which I found particularly interesting from an implementation perspective were the Biometrics and Notifications support.
Biometrics
For biometrics, I found this native feature simpler to utilise then I initially expected. I was able to use the onAppear() handler on the VStack element with a few @State variables in the application's entry-point, WorrybookApp. When the application is loaded, it will determine whether the user can be authenticated. At this level, all the view cares for is the state where it will either load the HomeView, or load a splash-screen and attempt to authenticate.
@State private var isUnlocked = false
@State private var encounteredBiometricProblem = false
// ....

VStack {
    if isUnlocked {
        HomeView()
    }
    else {
        // ...
    }
}
.onAppear(perform: authenticate)
.alert(isPresented: self.$encounteredBiometricProblem) {
    Alert(
        title: Text("Oops!"),
        message: Text("It looks like we can't authenticate you. If you continue to encounter issues, please report the issue via the website."),
        dismissButton: .default(Text("Try again"))
    )
}
As for the authentication itself, we pass a function to the handler which uses an instance of the local authentication context to check whether the device supports biometric authentication firstly, then proceeds to either present a biometric authentication request to the user and report any problems via another @State variable, or permit the user into the application when their device lacks biometric features.
private func authenticate() {
    let context = LAContext()
    var error: NSError?

    if context.canEvaluatePolicy(.deviceOwnerAuthenticationWithBiometrics, error: &error) {
        let reason = "We need to verify you to gain access to your data."

        context.evaluatePolicy(.deviceOwnerAuthenticationWithBiometrics, localizedReason: reason) { success, authenticationError in
            if success {
                self.isUnlocked = true
            }
            else {
                self.encounteredBiometricProblem = true
            }
        }
    } else {
        self.isUnlocked = true
    }
}
Notifications
For scheduling and managing notifications, there is two primary modules involved in this - SettingsController and NotificationHelper. The former being the interface between the presentational elements allowing the user to manage application settings, such as specific notifications, and the latter being a reusable amalgamation for the native Notification API interface. Meaning, based on the users choice to enable or disable a notification, we store that state and notification time, then schedule the repeating daily notification. When the user disables it, we have the unique notification GUID to locate and remove the notification from the device schedule.
It's far from perfect from a code perspective (which I certainly intend to improve), but I had a fun time learning the native API, understanding how recurring notifications are scheduled, and how to interface and manage these on-demand with some asynchronous task management in Swift (DispatchGroup).
Continuous Integration
To limit environmental issues, the application is configured to be automatically built using Travis CI via GitHub. As usual, I set this up early in the product's development to ensure its benefits are available early in the product lifecycle.
Using Travis with GitHub, it neatly takes care of pull request and merged-based build verification, which is a great advantage. Having used Travis before with macOS applications, it seemed familiar enough to configure for iOS applications with minimal effort - "If it isn't broke, why fix it?!"
Review
As with any codebase, opportunity for improvement exists. But overall, I'm happy with the general implementation of the application and the decisions made. Certainly, I'll be looking to set time aside to refactor code from a unit perspective and a structural perspective, such as inserting service classes to mediate between controller and repository modules and improving the consistency of coding style, such as variable scopes and declarations.
What's more, on the topic of refactoring, there's work to do to research and apply more Swift best practices and refactor various modules and tightly-coupled connections between them to be testable. Although unit and UI testing projects were added to the workspace, these have lacked attention to this point, so certainly an opportunity for myself or another contributor to improve the application and its codebase there.
Ongoing Development
Other than the typical refactoring, I'll be looking to factor in time to implement any feedback from beta testers, users, and implement a few items I've noted myself, such as
- Pin-based auth for those users with older devices and those without fully-functional biometric hardware
- Enhanced views upon local user data, such as statistics and trends.
- Improve item management with search and bulk actioning.
Check out the code base, contribute, or submit features or issues on GitHub. In the meantime, I'm off to write up the publishing stages ✌️